Windows Installation
Minimal Requirements
If you want your computer ready to start using our API, you will need to install some programs and dependencies. In this section, we will work on the Windows installation procedures. However, Linux and macOS are also supported!
Only x64 based operating system is supported
Please, don't run all the programs shown here before knowing what it does.
Programs used
Our API requires some programs to run smoothly. Nonetheless, not all of them are needed, but recommended. We will let you know if a program is only optional! Please, check the table below.
| Program | Description | Optional |
|---|---|---|
| PuTTY | For serial port communication (e.g. RS-232 and UART) | Yes |
| Git | Version control system | No |
| Docker | Toolkit to create/deploy/run/stop containers | Yes |
| Mbed CLI 1 | Dependencies managment and Mbed OS build system | No |
| STM32CubeProgrammer | Download and upload firmware to/from devices over many interfaces | Yes |
| WSL | The Windows Subsystem for Linux let you run a Linux environment on Windows | Yes |
Mbed CLI 2 is available, but the API does not support it at this moment. Neither does it support Mbed OS 6 or higher.
Windows
To install all programs on Windows is very simple. It is necessary to have Windows 10 build 19041 or higher, 4 GB of RAM, hardware virtualization support must be enabled on the BIOS settings, enable WSL 2, and an updated Linux kernel package. If you don't have WSL 2 enabled, just follow this guide.
This guide is divided into two parts. Part I involves installing and configuring WSL, and Part II focus on Windows programs and their integration into WSL. There is also an optional section that integrates VS Code and WSL, thus all the work environment is in one place (under Windows).
Part I: WSL
WSL 2 stands for Windows Subsystem for Linux 2. It is a very lightweight Linux virtual machine on Windows. To enable it, search for Windows Terminal on the Start menu on Windows 10. Right-click the top result and select Run as administrator. After the prompt is open, please type:
wsl --install
If you are having trouble pasting something into the Terminal, please right-click the mouse on the Terminal (instead of `ctrl+v). The same is true to copy from the Terminal. You can do that by selecting what you want to copy and then right-click it.If you can't find the Windows Terminal, you may have to install it. Another alternative is to run as an administrator the Command Prompt, or
cmd.
To finish the installation, you will be prompted to reboot your system.
If desired, you can choose which distro to install. To check the available distros for WSL, you can run on the Windows Terminal:wsl -l -o. This documentation only covers the default installation distro (Ubuntu). For all of that and more, please check here. Beware that this installation guide only works for WSL 2.
After rebooting, the following window will pop up:
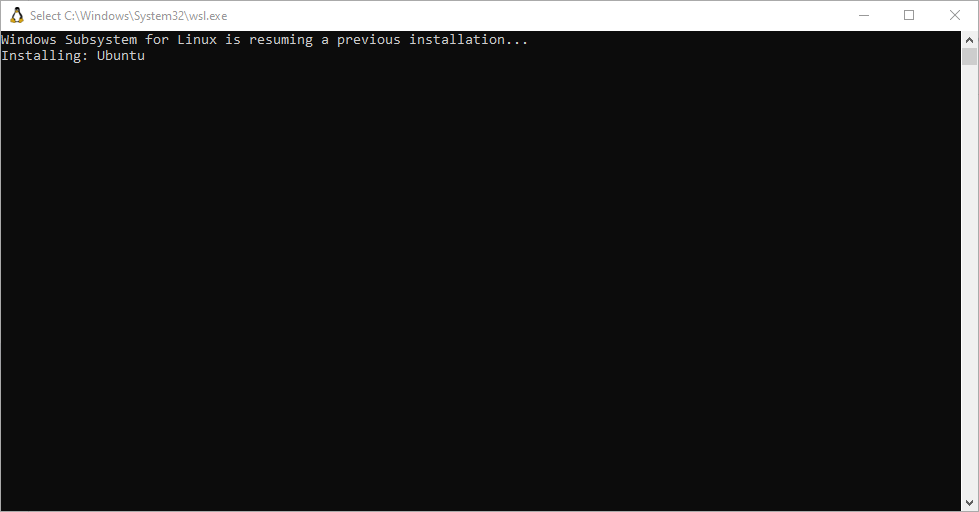
WSL installation procedure
After it is done installing, you will be prompted for a username and password. This username does not need to be the same as the one you use on Windows. Feel free to choose whatever you want. If there was an error message, please check the Troubleshooting documentation.
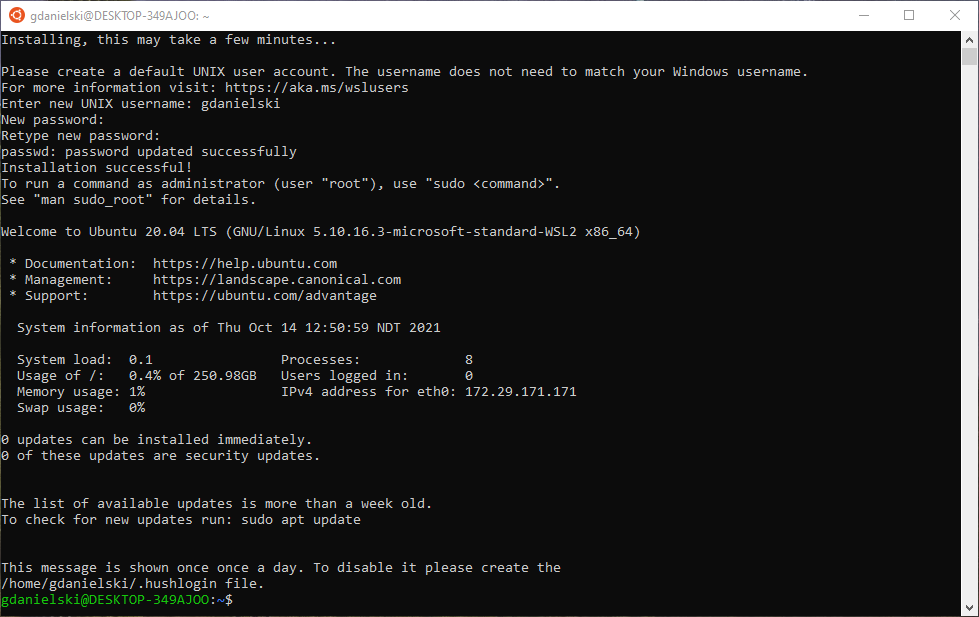
Successful Ubuntu installation under WSL
Now you have a Linux subsystem in your Windows machine. You can access it by searching on the Windows Start menu for the distro installed (by default Ubuntu).
From this point on, it is possible to use only Windows. However, you may face some problems not covered by our documentation. Moreover, you also lose in performance, as almost all the tools used were developed with Linux in mind. This means that many applications required will run under Linux, even on Windows systems. This makes debugging a bit harder and slows down the compiler. With this in mind, we recommend you to use WSL for application development using the API.
If you are not familiar with Linux, don't worry! You will just need to set up your computer once, and then you will not even remember about WSL. If you follow this guide, the end result is a VS Code with a Linux Terminal to build applications (the building process is automated), PuTTY for serial communications, and STM32CubeProgrammer to flash the binary. You won't need to open WSL to run any code, so everything is available on Windows.
Even if you are familiar with Linux, it is recommended you follow this guide instead of the Linux Installation page. If you do so, you will have an integrated solution. Beware, there are some details regarding WSL. The main ones are that only WSL 1 can use serial ports and Docker only supports WSL 2. Check here for more information.
You can access your Linux files in two ways:
- Enter
explorer.exe .on the WSL Terminal. - Enter
\\wsl$on the Windows Explorer directory.
For best performance, leave all your project files in the WSL directory. Don't access, modify or create Linux files in the%LOCALAPPDATA%folder.
Update
Before continuing, please update your WSL. To do that, just open the WSL and write these commands, and hit Enter:
sudo apt update && sudo apt upgradeIt will also ask you for the sudo password:
[sudo] password for <user name>:Here you type the password that you used when creating the new user in the previous step.
When you see the symbol
< text >, it means that this field changes. Thetextinside describes what should be substituted there. For example, the<user name>indicates that the field is populated by the current user name.
If there is any update, it will prompt you to confirm you want to install the update.
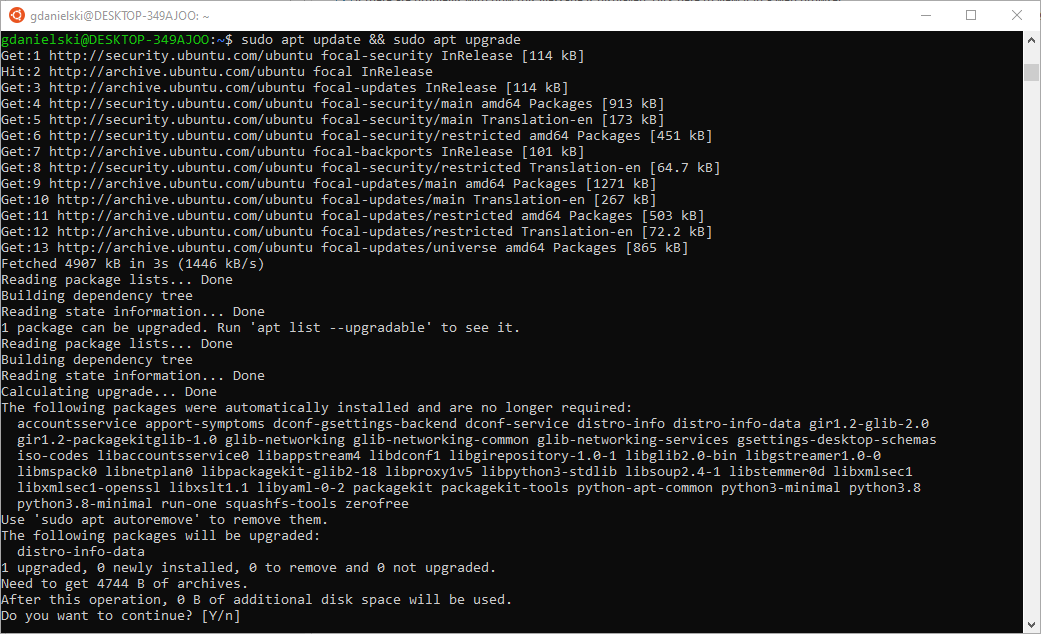
Confirmation prompt
Just hit Enter and wait for it to finish. After it is done, if you want, you can remove any unnecessary files:
sudo apt clean && sudo apt autoremove && sudo apt autoclean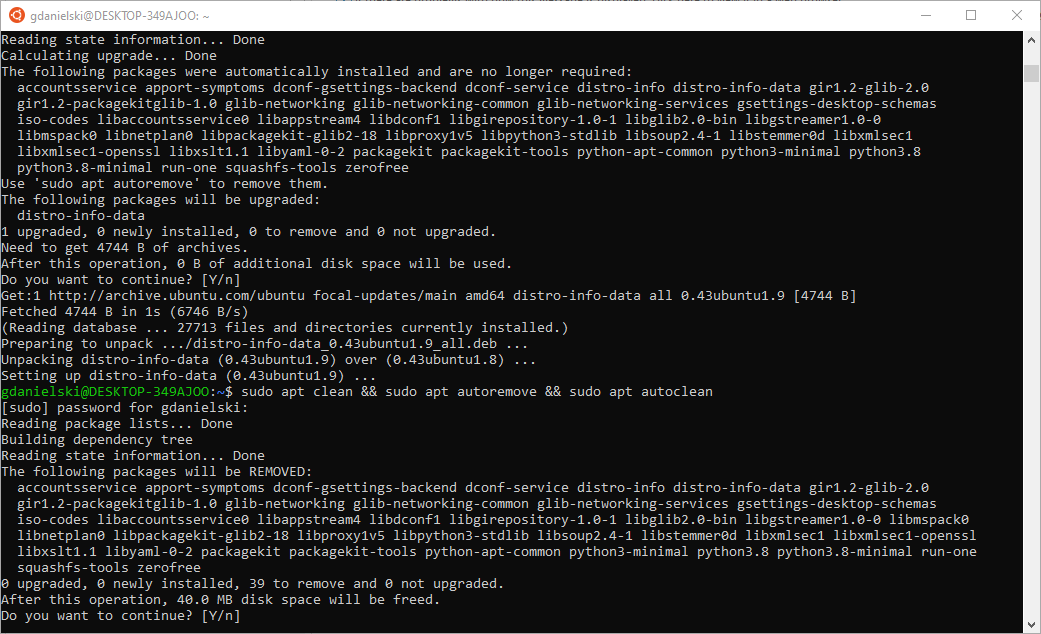
Removing unnecessary files
Notice in the above image that there are a number of packages used during the update that is not used by any other application. You can hit 'Enter' to remove all of them.
Git
Git is a free and open-source distributed version control system. Git comes preinstalled with the distro. Therefore, no action is needed here. You can check if it is installed by using the following command:
git --versionIt will display something like this:
git version 2.25.1For more information regarding Git and WSL, check the official documentation
GCC
GNU Compiler Collection (GCC) is a front end for C, C++, Objective-C, Fortran, Ada, Go, and D. The Mbed OS is compatible with Arm Compiler and GNU Arm Embedded. As the ARM Compiler is proprietary, let's install GCC. Run the following command on WSL:
sudo apt install gcc-arm-none-eabiHit 'Enter' to continue the installation.
On Linux, when you install a package, the package manager (in this caseapt) will install all the dependencies necessary to install and run the application. You can check the packages installed when you run the previous command here.
Check if the ' libnewlib-arm-none-eabi' library is installed:
apt list --installed libnewlib-arm-none-eabiThe output should look like this:
Listing... Done
libnewlib-arm-none-eabi/focal,now 3.3.0-0ubuntu1 all [installed]
If it is not installed, it will just say Listing... Done. If this is the case, install it:
sudo apt install libnewlib-arm-none-eabiMbed CLI
Mbed CLI 1 is a command-line interface for Mbed OS. The main advantages of Mbed OS are that it is an RTOS with fully integrated connectivity and security components, and its hardware abstraction layer (HAL) supports Arm Cortex-A, M, and R series.
Mbed OS is a very comprehensive tool, and right now, Mbed OS 6 is the newest release. However, the API supports, for now, Mbed OS 5 version 5.8.0 or greater (up to 5.15).
We recommend you look at the Mbed CLI 1 installation manual, which can be found here. Either way, here we show the main steps to install it on WSL.
First, we install the dependencies:
sudo apt install python3 python3-pip python3-dev mercurial Now we can install Mbed CLI 1:
python3 -m pip install mbed-cliAfter installing it, there may be some dependencies left to install. Mbed OS has a text file with all the requirements needed. As it changes accordingly to the Mbed OS version, please check on mbed-os/requirements.txt.
To check if Mbed CLI was installed correctly, you can run:
mbed --help
If the message '-bash: mbed command not found' appears, you only need to close and open WSL again. It is not required to do this now, as this will be required to do again at the end of this guide. If you closed the WSL window, you can open it again by searching on the Windows Start menu for the installed distro. If you didn't choose any, then it is Ubuntu by default.
Notice that we installed Mbed OS using Python. This means that we can only update it using it (no need to update it now):
python3 -m pip install -U mbed-cli
(Optional) If you want to have bash-completion for Mbed CLI commands, you can check the Linux Installation guide. If you are not familiar with Linux, you can skip this step. You won't need it, as the building process (which requires Mbed CLI commands) is automated for you.
Part II: Windows
If you just finished Part I, you can close the WSL Terminal. All the steps in this section won't require any Linux commands and they will provide information on how to install important Windows programs.
Docker
The use of Docker is essential to build applications that use our API. However, you don't have to know how to use Docker to be able to create an application! Everything is automated for your convenience. In case you don't want to use Docker, you will need to install the toolchain to build the application.
To install Docker, we recommend their Windows installation manual; for that, click here. You can also follow the steps given here as guidance.
First, download the installer. Start the installation process on Windows, follow its instructions, and wait for it to complete. It will prompt you to log out of Windows and log back in.
After logging back in, read and accept the terms of services. If no window did pop up, start Docker Desktop from the Windows Start menu. A message will appear asking if you want a Docker tutorial. It is not necessary to proceed with it, but it is recommended so you understand what Docker is and how it works.
From the Docker menu, select Settings > General and select the Use WSL 2 based engine check box (should be ticked by default). If it is not ticked, tick it and restart your computer. Following that, go to Settings > Resources and check if Enable integration with my default WSL distro is ticked (it is also ticked by default). As there is only one distro installed, there is no need to tick anything else. If you happen to have more than one distro, check for instructions here. Reboot the computer if you had to tick anything.
PuTTY
In Windows, you can use PuTTY as your serial-port terminal application. For that, download the installer and follow the instructions.
If you are following this guide, know that you can't access serial ports on WSL 2. This is possible on WSL 1, but you will face some other challenges. It is recommended to access serial ports through Windows, instead of WSL.
On Windows, you can see the serial port number on the Device Manager. You can open it by searching for Device Manager on the Start menu on Windows 10. Hit Enter and it will open. Click on the arrow besides Ports (COM & LPT) to expand the submenu. There you will be able to check the serial ports used. In this case, COM7 and COM8 are being used by two USB-to-UART converters.
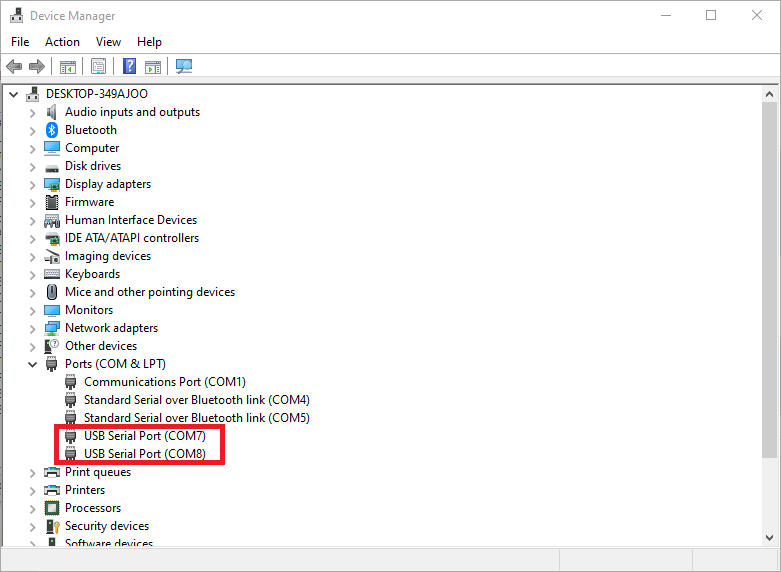
Serial ports used by the USB-to-UART converter
By identifying the ports, you can configure PuTTY properly. Open PuTTY and on the radio button select Serial. In the Serial line field, populate it with the serial port. In this case either COM7 or COM8. Under Speed, change from the default (9600) to 115200 (this is the Vitro Crystal and Shard default baud rate). Name this configuration in the Saved Sessions and click on Save. When you need to use the UART port, you now only need to double-click on the configuration you created to open the channel. Please check the image below to see how the previous two ports were configured. Serial port COM7 is saved under the name Crystal and COM8 will be saved as Edge after the button Save is clicked.
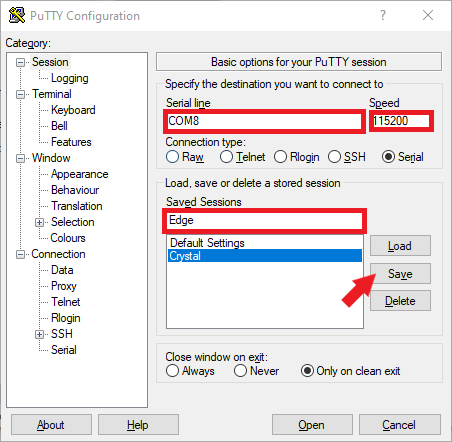
PuTTY configuration
Flashing Application with STM32CubeProgrammer
Shard comes with USB programming capabilities through the USB connector attached to Shard Edge. The best option is to use STM32CubeProgrammer. For more information, go to the Vitro Shard Programming section.
STM32CubeProgrammer is an all-in-one multi-OS software tool for programming STM32 products delivered in GUI (graphical user interface) and CLI (command-line interface) versions. STM32CubeProgrammer provides an easy-to-use and efficient environment for reading, writing, and verifying device memory through both the debug interface (JTAG and SWD) and the bootloader interface (UART, USB DFU, I2C, SPI, and CAN).
To install it on Windows, just download it and follow the installer's instructions. For more details, please refer to the manual.
It is possible to install it in WSL, but you won't have access to the USB port. Thus, making the program inoperational. Therefore, install on Windows.
Wrapping up
It is recommended that you clean up any leftovers. Thus, first, update WSL:
sudo apt update && sudo apt full-upgradeAfterward, remove unneeded packages and retrieve package files:
sudo apt autoremove && sudo apt clean && sudo apt autocleanNow, close the WSL window. Reboot Windows for the software to be operational.
Optional
You now have all the tools necessary to start creating your own application. However, there are a few tweaks that can be made for a better experience. There are many IDEs you can choose from (to program an application for Vitro Shard is not IDE dependent). You can check some recommended IDEs in our IDE documentation. Nevertheless, if you are running Windows and WSL, it is recommended to use VS Code for better integration. You can read more about it here.
VS Code
First, install VS Code by downloading it here. Please follow the installer's instructions. When prompted to Select Additional Tasks during the installation process, please check the Add to PATH option so you can easily open a folder in WSL using the code . command.
To achieve the desired results, please install VS Code on Windows, NOT in WSL.
After the installation is complete, open VS Code, press Ctrl+Shift+X, write remote - WSL, and hit Enter. Click on the Install button under the Remote - WSL extension. For more information, check here. The image below show this:
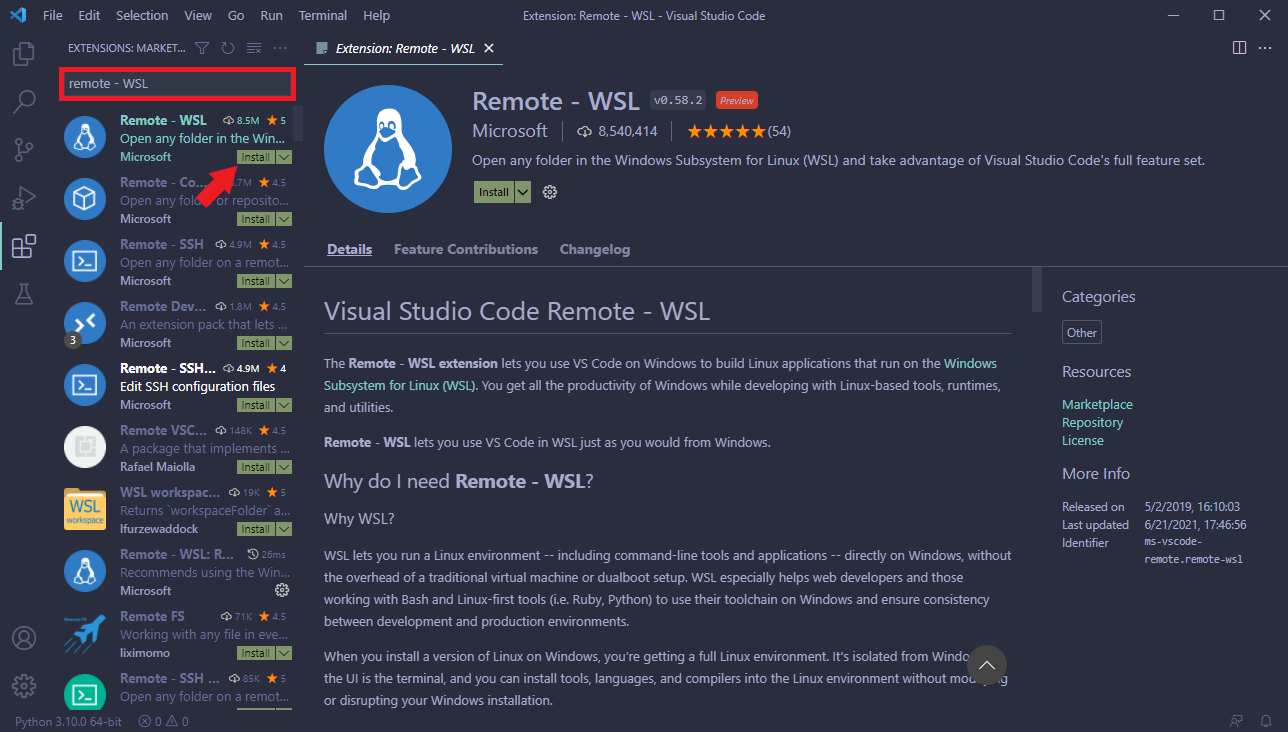
Installing Remote - WSL
It is also recommended that you follow the same process to install the C/C++ extension. For more information regarding extensions and tips, you can check the official documentation.
Installing Dependencies
Open the WSL environment by searching on the Start menu for the distro you installed. If you didn't choose one, search for Ubuntu.
Again, check for any updates and install them if there is any:
sudo apt update && sudo apt upgradeInstall the Remote - WSL dependencies (if you are using Ubuntu, probably you already have them installed):
sudo apt install wget ca-certificatesYou can now close the Terminal window.
Setting Up Remote - WSL
When you use the Remote - WSL extension, VS Code starts a remote VS Code application. This means that all the extensions installed on your machine are not installed in the remote one. To start the remote session, open VS Code and click on the computer logo on the left. It will display all the possible remote sessions available. Click the installed distro (Ubuntu by default) and press the Connect to WSL button. Please check the image below:
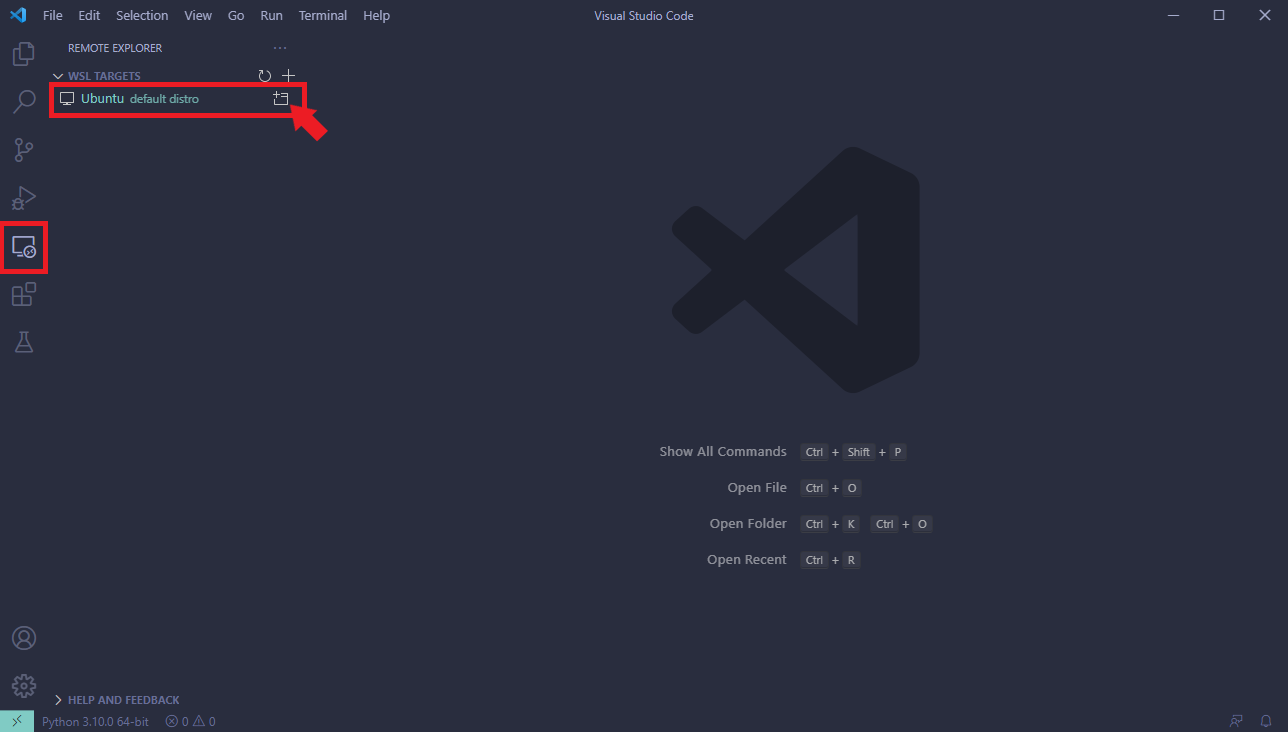
Creating a remote session
Extensions
After clicking the Connect to WSL button, a new VS Code window will open and connect to WSL. This remote session works as if VS Code is running on WSL. Thus, you can access any files in your distro this way. Before continuing, let's install the necessary extensions again. Click on the extension icon (or Ctrl+Shift+X), and you will see something like this:
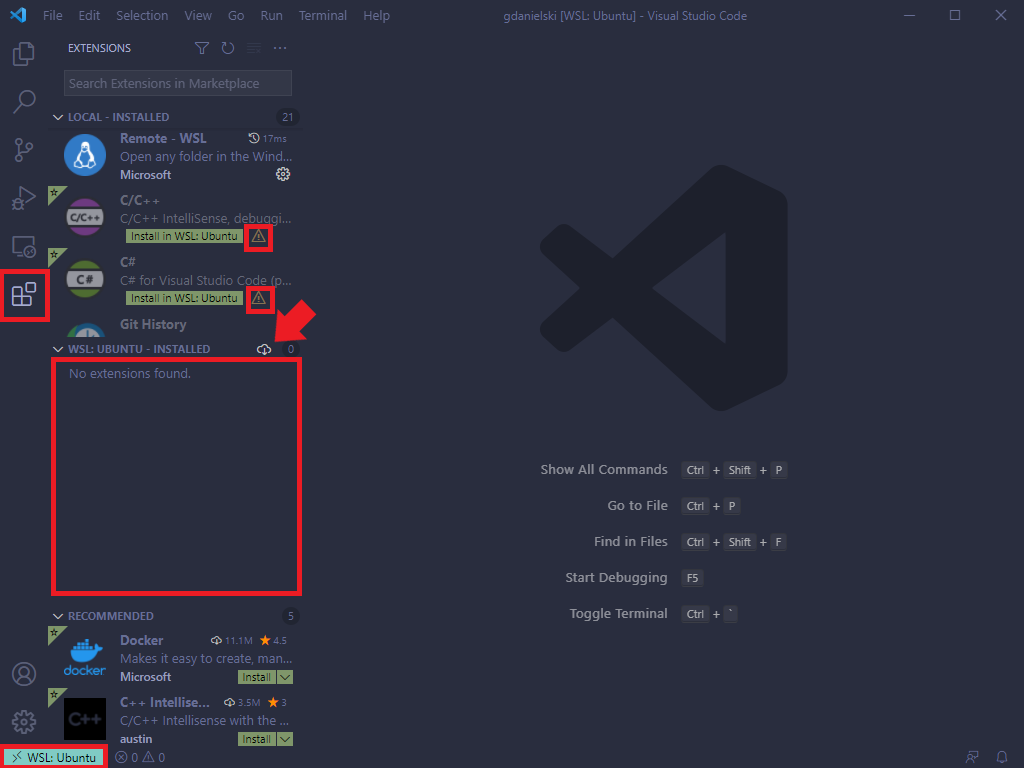
Remote session extensions
Notice there are two directories for extensions: one for the local machine (i.e., Windows) and another for the WSL distro (Ubuntu). Another remark is that the latter is empty, and the former has orange triangles on some extensions. These triangles indicate that the extension is only installed in the local machine, and the remote one can't access it. There are many ways you can install these extensions in the remote machine: the same way as before (but in the remote session), by clicking the Install in WSL:<distro name> green button, and by clicking the cloud (shown by the red arrow on the image). Let's just install C/C++ for now, but feel free to add any other of your liking.
Terminal
You now have access to the Linux files and a working IDE. The last thing we need is a way to build the application in VS Code. To do this, go to View > Terminal and the WSL Terminal will open:
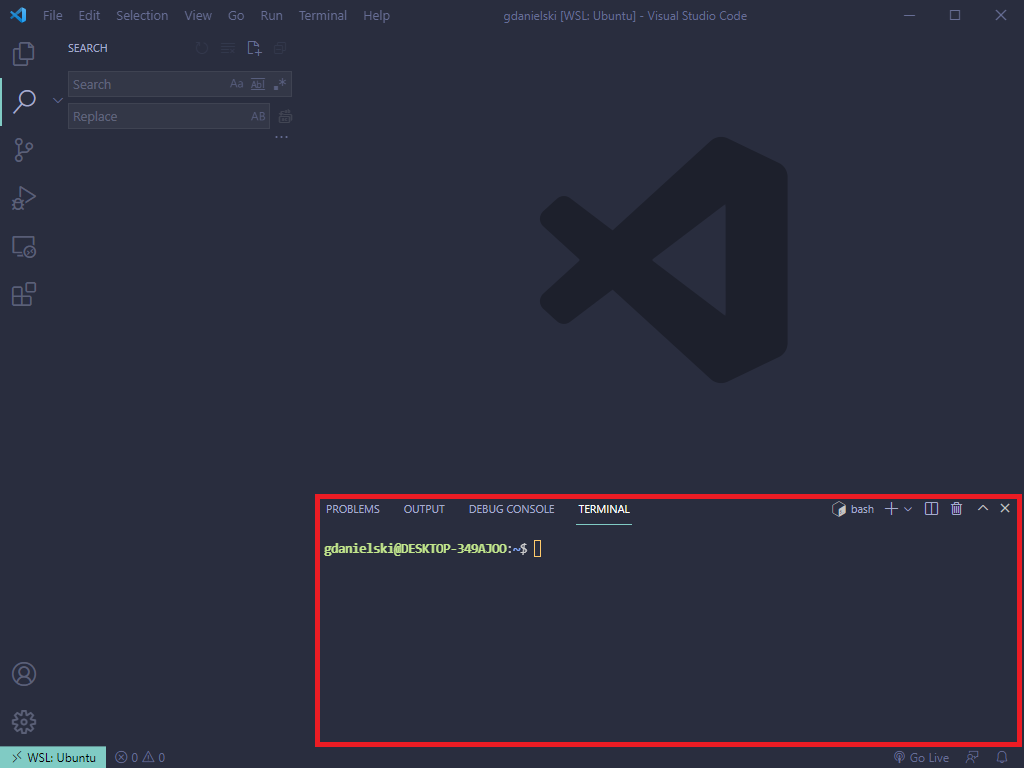
WSL terminal on VS Code
Now everything is set! You just need to follow the instructions on our guides. Almost everything can be done using VS Code and its embedded terminal. There are only two actions that need to be done outside it: serial communication (PuTTY) and flashing the MCU (STM32CubeProgrammer). The serial communication was already covered, thus for completeness's sake, you will also find how to flash it using STM32CubeProgrammer and WSL.
Flashing
You can find more detailed information in the Vitro Shard Programming documentation. This section only covers the particularities due to WSL.
Open STM32CubeProgrammer and connect it to the device via USB. After the connection is successful, click on the Open file tab. The explorer will open to select the file. Thus, in its directory, please write \wsl$ (so it can access the Linux directory). Select your distro of choice and navigate until you find your file. Follow the instructions in the Vitro Shard Programming documentation.
If you don't know the file's location, go to the VS Code terminal (where you build the application) and run the command:explorer.exe .. The explorer window will appear in that directory, thus showing you its location.
Updated 9 months ago
