API Application
API Application
In this documentation, you will find an example of creating and building an application for Vitro Shard and Vitro Shard Edge. The sensor used is DHT22, which measures the temperature and humidity. A good tutorial and guide for it are from Adafruit.
All the SDK library components available to you are placed in thevitroio::sdknamespace. The components that should be used exclusively by the API and SDK are placed in the 'vitroio::sdk::impl` namespace.
Driver
The driver is based on the inner workings of the sensor. They are layout on the DHT22 datasheet workings and how the DHT22 should operate is written there.
dht22_defines.h
This header aims to define all the configuration parameters. Here we explain how to create it from scratch. You can follow this guide:
The fifth byte is the checksum. This will be implemented later.
dht22_driver.h
For the driver header, let's break it down for better understanding:
dht22_driver.cpp
The driver is heavily dependent on the product datasheet. Please, get familiar with it before proceeding. You can follow the next steps to create your own DHT22 driver (dht22_driver.cpp) from scratch:
Sensor Interface
This section doesn't rely on the datasheet anymore, as it only aims to provide a generic interface for the sensors. As mentioned in the API Overview, this requires the abstract_sensor_interface.h from the API.
sensor_parameter.h
The sensor_parameter.h sets the parameter ID for each sensor. In the case of the DHT22 sensor, it has two sensors: relative humidity and temperature. This means that we need two parameters ID:
This is a header file for all sensors. Therefore, if you have more than one, just add its parameters here.
dht22_sensor_interface.h
The sensor interface header is defined as follows:
dht22_sensor_interface.cpp
To create an extra abstraction layer to the API, and leave all the sensor's measurement implementation details for a class, we can create the DHT22 interface. This provides an interface between the DHT22 driver and the Measurement API. You can easily create one yourself. As an example, just follow these steps:
It is essential to understand that this is the sensor interface. Thus, all its details should be considered. Our Github repository has more examples where you can better understand some particularities for your use case.
Vitro Shard Edge Connection
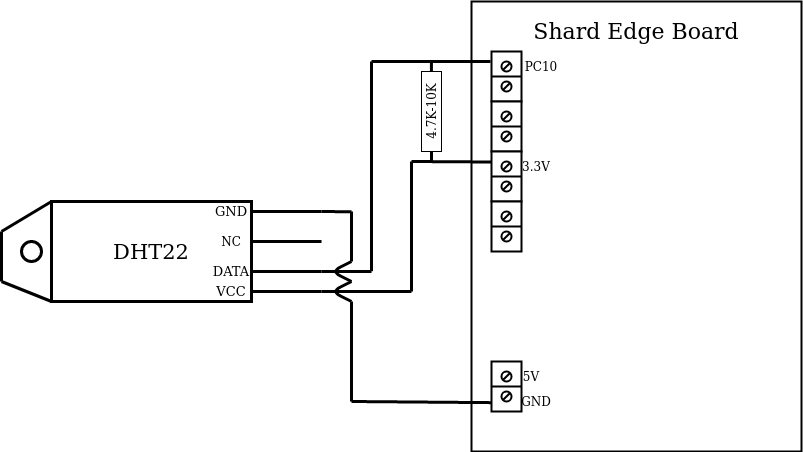
According to the DHT22 datasheet, there is no need for a pull-up resistor, as opposing to DHT11 datasheet. However, it is important for reliable operation, therefore a pull-up resistor in the 4.7k-10kΩ range. This is shown by Adafruit tutorial.
There are two versions of this sensor, with and without a PCB. If you have the one mounted on a PCB, you don't need the pull-up resistor.
One possible connection to Vitro Shard Edge is through the PC 10 port for data, any ground port (GND), and the 3.3V port next to PC10. However, sometimes the 3.3V is not enough. If this is the case, you can then use the 5V output to power it on. The following diagram shows this:

DHT22 connection diagram.
There are many GND ports; you can use any of them. The diagram above is just a suggestion. The only port that changes the code is the PC10 one, as you need to know where the data pin is connected to Vitro Shard Edge to take the measurements.
Application
After creating the driver and interface, we can create the application. As all the abstraction was done previously, the code on `here usually doesn't change much. Either way, the code was broken down for you:
The application uses threads and event queues from the Mbed OS library.
The Thread class has two configuration inputs: osPriority and the memory stack size (in this case 0x1800) for the thread. The list with all the osPriority options are available here. It is recommended that you get familiar with Threads, Ticker, and EventQueue for a better programming experience. A good starting point are these tutorials from Mbed OS: application flow control, RTOS, and The Eventqueue API.
Status LEDIf you want a status LED, Vitro Shard Edge does have it. The LED is connected to the
PA5pin. It is also defined incommon/global_consts.hwith the variable nameVITROIO_TEMPLATE_STATUS_LED_PIN. After that, just initialize it:
DigitalOut statusLed(VITROIO_TEMPLATE_STATUS_LED_PIN);
DigitalOutis an Mbed OS class. You can read more about it here.
Updated 9 months ago
