API Details
API Details
This documentation has some information on the implementation of some firmware functionalities.
Bootloader changes
By default, the bootloader checks what application should be executed and runs it. Therefore, our firmware requires some changes for safer operation:
- Fixed image layout: Each part of the firmware have a fixed size. Their values are in the Environment variables area and can be adopted by the source code.
- Public key: The public key for secure boot must be at the end of the bootloader's binary.
- Hash capabilities: The bootloader must be able to hash applications A and B. This is done by using mbedTLS library and mbedtls_sha256_ret hash function.
- Signature verification: The bootloader must perform signature verification of applications A and B for secure boot. This is also done using mbedTLS library, but now with the mbedtls_ecdsa_verify function.
- Secure Boot: If the signature verification succeeded, the bootloader should jump to the application. Otherwise, the platform should hang in an infinite loop.
Secure Boot
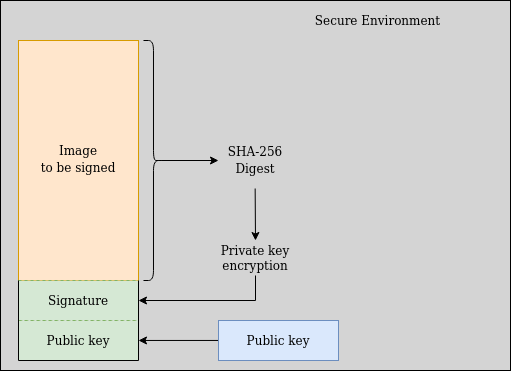
The first part of the secure boot process is the key generation. The keys are created using the RSA algorithm for a given length, e.g., 4096-bit. This means that asymmetric keys are used. Thus, the private key is for signing (encryption), and the public key is for verification. After generating the public key, it should be added to the end of the bootloader's binary.
Next, the application is hashed after being built. In our API, we use SHA-256. After, the application's digest is signed using ECDSA. Finally, the signature is appended to the signed image. In the Vitro Shard case, adding it to the firmware Environment Variable's area is more reliable. The signed image and the signature are then flashed into Vitro Shard.
You also need to configure the hardware. For details on how to do that, please check our Hardware Guide.
The following image shows the process:

Secure Boot image signing.
Key generation and image signing processes must be done in a Secure Environment.
Image Authentication
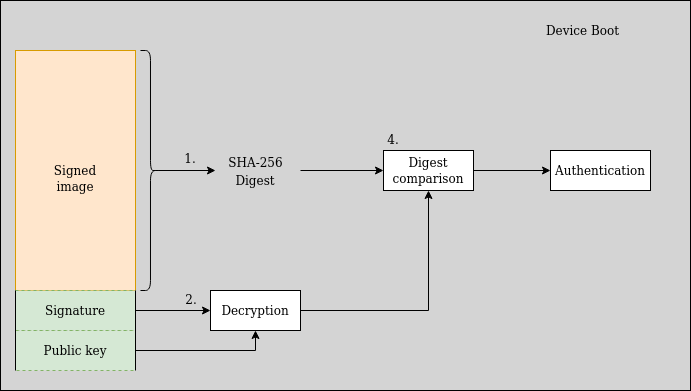
When the Secure Boot is enabled, the signed image and the bootloader can verify signatures. The authentication process is as follows:
- The bootloader locates the application and hash it.
The application always starts on the same memory address.
- The bootloader decrypts the signature on the Environment Variables section of the image by using the public key embedded at the end of the binary.
- The signature's decrypted digest is then compared to the digest previously computed by the bootloader.
- If it is equal, then authentication succeeded. Otherwise, the platform hangs.

Secure Boot authentication diagram.
Firmware changes
To properly implement Secure Boot in Vitro Shard's application, there must be some restrictions introduced. The diagram below shows the image layout after building it. Please, notice the offsets values.
+----------------+ ------- 0x00000
|                |
|   Bootloader   |
|                |
+----------------+ ------- [Bootloader size]
|                |
|  Environment   |
|   variables    |
|                |
+----------------+ ------- [Bootloader size] + 0x800
|                |
|     App A      |
|                |
+----------------+ ------- [Bootloader size] + 0x800 + [App A size]
|                |
|     App B      |
|                |
+----------------+ ------- [Bootloader size] + 0x800 + [App A size] + [App B size]
As you can see, Bootloader, application A and application B sizes vary. However, remember that the bootloader needs to find the application to hash it. One way to do this is to pre-allocating memory space for each part of the firmware. Doing so, the Secure Boot code inside the bootloader knows the application size and memory address. The firmware layout is shown in the diagram below:
+----------------+ ------- 0x00000
|                |
|   Bootloader   |
|     (with      |
|     embedded      |
|    public key) |
|                |
+----------------+ ------- 0x10000
|                |
|  Environment   |
|   variables    |
|  (with embedded   |
|   app A/B's    |
|   signature)   |
|                |
+----------------+ ------- 0x10800
|                |
|     App A      |
|                |
+----------------+ ------- 0x88000
|                |
|     App B      |
|                |
+----------------+ ------- 0x100000
The sizes are:
Bootloader: 64kB.Environment variables: 2kB.Application AandB: 490kB each.
The entire flash memory (1MB) is filled in such configuration, and there is no space for additional image parts. The bootloader should have enough memory space to implement the verification algorithm while the application still has plenty of room.
Advantages
There are many advantages to use secure boot on Vitro Shard's applications. Generally speaking, secure boot, directly and indirectly, mitigate multiple threats:
- Bootloader's memory area is protected against reading, erasing, and writing. The attacker can't change this configuration either.
- Application memory area is unprotected against reading, erasing, and writing. However, changing it is harmless. OEM must sign any change.
- Writing custom malicious application (not the bootloader) is possible but ineffective. As long as OEM does not sign it, the bootloader will not select the application and will hang.
- Reading the entire flash memory is pointless because there is no sensitive data. Secure boot is based on public-key cryptography. Thus the key stored in the flash memory is publicly available.
- Only verified, previously signed images can be run on Vitro Shard.
Key Generation
For a secure communication channel and operation, Vitro Shard uses symmetric and asymmetric keys. The entire process of generating and storing them is done once and in a secure OEM environment.
All the RSA key pairs are generated using OpenSSL. The private symmetric key is stored in the Keystore, the private asymmetric one is stored internally in the crypto module (where it can't be read), and the asymmetric public key is openly available and embedded into the bootloader's binary.
Application Signing
Four binaries are available after building the firmware when using the available scripts: final, bootloader, application A, and B binaries. You can sign applications A and B by using OpenSSL by treating their binaries as a file. It is important to do that in the same secure environment that the keys were generated. When the signature is created, it must be added at the end of the Environment Variables section.
If applications A and B are the same, you need to sign only one file. Remember that a hash function generates the same output when given the same input.
This process is used for secure boot, as mentioned previously. However, if the user enables it, they can only flash the device with the key. Otherwise, it is treated as a malicious attack.
Over-the-Air
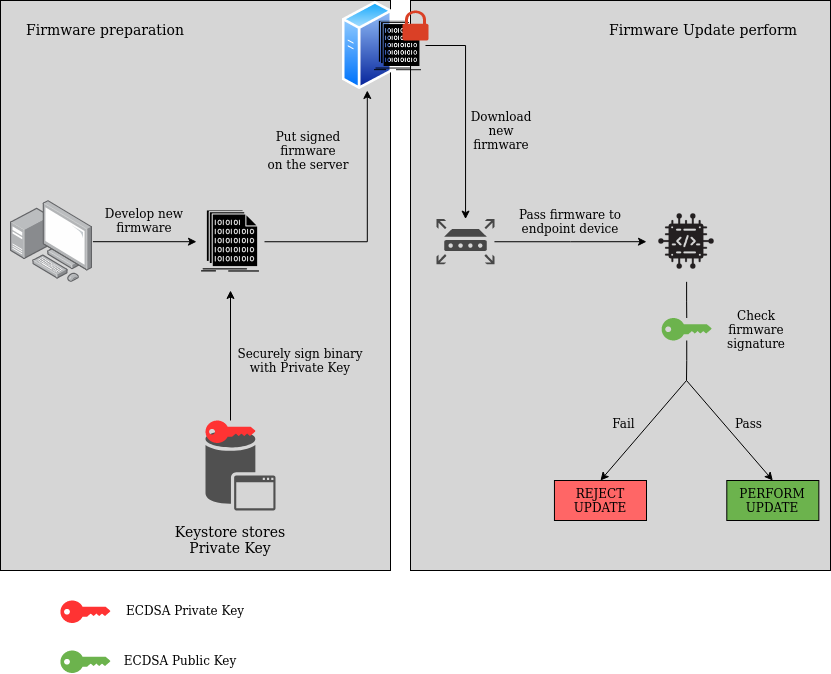
Secure Firmware Update (SFU) is tightly related to the secure boot feature. It is used to flash a new firmware to MCU via the Over-the-Air method. It operates by checking if an authorized entity signs the new binary. The signature is based on public-key cryptography, so keeping the private key in the endpoint device is unnecessary. If authorization is confirmed, the new firmware is being flashed. Otherwise, it is rejected, and the update doesn't start.
The new firmware's authenticity must be checked on the target device. It shouldn't be done earlier, e.g., in the intermediary gateway. This is to assure that there is no data corruption in-between.
A high-level description of SFU operation is shown in the diagram below. Please notice that the gateway is only a pass-through device that downloads signed binary and handles it further to the endpoint device. The firmware is checked by endpoint, and the update is performed after checking the signature.

Secure Firmware Update diagram.
The signature verification process is somewhat similar to secure boot. The main difference is that SFU aims to determine if it should accept the update while secure boot analyzes if it should boot the application.
Implementation
Vitro Shard firmware can be updated via Firmware Over The Air feature. Under the hood, it uses the SWUpdate tool. In this process, the new firmware is packed into the SWU package. The sw-description file describes the content. Such package is signed with a private key and placed in an AWS S3 bucket. The related public key is available in Vitro Crystal.
When the update process is triggered, the package is downloaded by Vitro Crystal, and its authenticity is checked. If it is successful, the file is unpacked and sent to Vitro Shard via the CAN bus. This approach is similar to Secure Firmware Update. The difference is that the firmware's signature is checked on Vitro Crystal (gateway) instead of Vitro Shard (endpoint). Therefore, for safer operation, the authorization should be entirely handed over to Vitro Shard.
Vitro Crystal should only be an intermediary device that downloads the package, unpack it and pass to Shard. Any cryptographic operation must be performed on the endpoint device.
The Upgrade Controller implementation on Vitro Shard is used to solve this problem. It handles the update process and performs all necessary operations (cryptographic included). It is a critical part of the update chain, and its code must stay unchanged. This controller is in the SDK; therefore, it is part of applications A and B. This means that it is in the memory address, which can be read and written.
Thus, Secure Firmware Update must be implemented alongside Secure Boot. Implementing it by itself is pointless, as it won't provide any security on Vitro Shard's side, as it is vulnerable to attacks. Without secure boot, anyone with physical access to the device can change the Upgrade Controller code and easily bypass its cryptographic security. Therefore, both features must be implemented with each other.
Your application security is as strong as its weakest link.
Details
As Secure Firmware Update implementation is dependent on secure boot, please check our secure boot implementation. Many of the necessary configurations and changes are already covered there. This implies that both of them should be implemented.
It is assumed that the same key pair is used in both secure boot and SFU. There is only one public key in the bootloader memory area by doing so.
Upgrade Controller
Upgrade Controller's objective is to trigger the update procedure on Vitro Shard, collect binary, and flash it into appropriate flash memory address. Thus, the following changes must be made:
- Hash capabilities: After receiving the signed binary image, Upgrade Controller must hash it. This implementation is based on Mbed OS, so it can be done using mbedTLS library, and mbedtls_sha256_ret hash function.
- Signature Verification: Upgrade Controller must verify the received image's signature. This is also done by using mbedTLS library, and mbedtls_ecdsa_verify function.
- Secure Firmware Upgrade: If the signature verification process succeeds, Upgrade Controller will flash the new firmware to the memory area corresponding to applications A and B. Otherwise, an error status is passed to Vitro Crystal, and the procedure is aborted.
Advantages
Let's consider what advantages Secure Firmware Update brings into Vitro Shard's applications:
- Updates can be done securely, without physical access to Vitro Shard.
- SFU allows for secure firmware upgrades, as it doesn't flash any malicious binaries. As a consequence, any data corruption will also be detected, and the upgrade process will stop.
- Only verified and previously signed by OEM image will be run on Vitro Shard.
- The same key pair used in Secure Boot can be used in this case as well.
As the public key is stored in the bootloader area, there is no way to change it. This increases security, as there is no possibility to use custom images with a custom key pair to perform an update.
Updated 9 months ago
